
The following shows how to do a hardware reset on the network camera and where the reset button is located.
1) Reset Steps
For cameras whose model suffix has -A or -B or -C or -D or -E (e.g: MS-C8165-PA,MS-5373-PB, MS-C2866-X4RPC, MS-C5375-FPD, MS-C5367-X23PE) with the software version is after xx.7.0.1
(Including TraffiX Series :TS5510-GH,TS5511-GH)
Step1: Press the reset button and hold on, then power on the network camera and the IR LEDs will begin to twinkle ;
Step2: Keep pressing the reset button until the IR LEDs stay always on;
Step3: It will take 1~3 minutes to complete the reset and the IP will turn into 192.168.5.190 (If the IP does not be changed into 192.168.5.190, please try again from step 1);
Step4: Modify your local IP by SmartTools again.
For cameras whose model suffix has -A or -B (e.g: MS-C3377-PNA, MS-C4463-FIPB) with the software version is before xx.7.0.1
Step1: Power on the network camera and wait 2 minutes when it is totally up;
Step2: Press the reset button for over 5~10s,until hear the voice of IR-cut and see the IR LEDs are always on;
Step3: It will take 1~3 minutes to complete the reset and the IP will turn into 192.168.5.190 (If the IP does not be changed into 192.168.5.190, please try again from step 1);
Step4: Modify your local IP by SmartTools again.
For other cameras whose model suffix has no -A nor -B: (e.g: MS-C2182-P)
Step1: Press the reset button before powering on the network camera (do not loosen);
Step2: Power on the network camera and keep pressing the reset button for 10s;
Step3: It will take 1~3 minutes to complete the reset and the IP will turn into 192.168.5.190 (If the IP does not be changed into 192.168.5.190, please try again from step 1);
Step4: Modify your local IP by SmartTools again.
For Indoor Parking Guidance Camera (PM3322-E)
Step1: Power on the network camera and keep pressing the reset button for 5-10s;
Step2: Loosen the reset button,wait for about 25s until the indicator light starts to change colors alternately;
Step3: It will take 1~3 minutes to complete the reset and the IP will turn into 192.168.5.190 (If the IP does not be changed into 192.168.5.190, please try again from step 1);
Step4: Modify your local IP by SmartTools again.
For 4G Solar-powered Traffic Sensing Camera (SC211-NA/EU/AU)
Step1: Power on the network camera and press the reset button.
Step2: Keep pressing the reset button until the indicator light turns red and begins to twinkle(Do not let the red light twinkle for more than 10s).
Step3: It will take 1~3 minutes to complete the reset and the IP will turn into 192.168.5.190 (If the IP does not be changed into 192.168.5.190, please try again from step 1).
Step4: Modify your local IP by SmartTools again.
For 4G Solar-powered Security/ANPR Camera(SP111-41/41L)
Step1: Power on the network camera and press the reset button.
Step2: Power on the network camera and press the reset button.Keep pressing the reset button for 5 seconds until the green LED flashes quickly 5 times, then it will flash slowly during the reset process. A solid green LED means reset is complete.
Step3: It will take 1~3 minutes to complete the reset and the LAN IP will turn into the 192.168.5.190(If the IP does not be changed into 192.168.5.190), please try again from step 1).
Step4: Modify your local IP by SmartTools again.
2) Position of the Reset Button
Mini Dome:
IR Mini Dome:Open the cover of the camera, a button like the figure shown below. 

Weather-proof Mini Dome:Open the back cover on the camera ball, you can use tools to achieve reset button like the figure shown below.


Vandal-proof Mini Dome: Open the cover of the camera, a button like the figure shown below.


Motorized Mini Dome: Open the bottom lid cover of the camera, turn off the two screws as shown below,you can use tools to achieve reset button like the figure shown below.


180° Panoramic Mini Dome: Rotate the dome,you can use tools to achieve reset button like the figure shown below.


Other: Open the cover of the camera, a button like the figure shown below.

Mini Bullet:
Motorized Mini Bullet / Weather Proof Mini Bullet / Color Vandal Proof Mini Bullet/ Entrance & Exit AI LPR Bullet/Other: Open the cover of the camera base, a black button like the figure shown below.


Vandal Proof Mini Bullet: Remove the back cover on the camera body, you can use tools to achieve reset button like the figure shown below.


180° Panoramic Mini Bullet: Remove the back cover on the camera body, you can use tools to achieve reset button like the figure shown below.


Pro Dome:
Pro Dome / Entrance & Exit AI LPR Pro Dome : Open the top lid cover of the camera, you can use tools to achieve reset button like the figure shown below.


Pro Bullet:
Remove the back cover on the camera body, a button like the figure shown below.


Pro Bullet Plus:
Pro Bullet Plus / Motorized Pro Bullet Plus / 5G AIoT Pro Bullet Plus / 5G Pro Bullet Plus/ 5G Motorized Pro Bullet Plus / Road Traffic Pro Bullet Plus / Road Traffic Parking Detection Pro Bullet Plus / Road Traffic Supplement Light Pro Bullet Plus / Road Traffic Radar Pro Bullet Plus / Road Traffic 5G Pro Bullet Plus / Entrance & Exit LPR Pro Bullet Plus / Entrance & Exit Supplement Light LPR Pro Bullet Plus / Outdoor Parking Management Pro Bullet Plus:Remove the back cover on the camera body, a button like the figure shown below.


Pro Box:
Pro Box / Pro Box Plus:a hole on the back of the camera, use pin or something like that to push the button deeper inside the hole.


PTZ Dome:
Open the dome cover and SD card cover, a black button next to SD card slot like the figure shown below.


PTZ Bullet:
PTZ Bullet / Road Traffic PTZ Bullet: Remove the upper housing and the SD card cover which on the left side of the camera body, a button like the figure shown below.


PTZ Bullet Plus:
PTZ Bullet Plus / Road Traffic PTZ Bullet Plus: Open the back cover on the camera body, you can use tools to achieve reset button like the figure shown below.


Speed Dome:
Speed Dome/ Road Traffic Speed Dome:Open the front cover of the camera, a black button like the figure shown below.


Fisheye:
Open the front cover of the camera, a black button like the figure shown below.


Dual-sensor 180° Panoramic:
Remove the SD card cover on the back of the camera , use pin or something like that to push the button inside the hole.


Solar-Powered Series:
4G Solar-powered Traffic Sensing:
Remove the SIM card cover on the back of the camera , use pin or something like that to push the button inside.


4G Solar-powered Security/ANPR Camera:
With power on, hold the reset button for 5s. The green LED flashes quickly 5 times to confirm, then flashes slowly during reset. A solid green LED means reset is complete.
Indoor Parking Guidance Camera:
Open the top cover of the camera, a black button like the figure shown below.


TrafficX:
TrafficX / TraficX Enforcement:
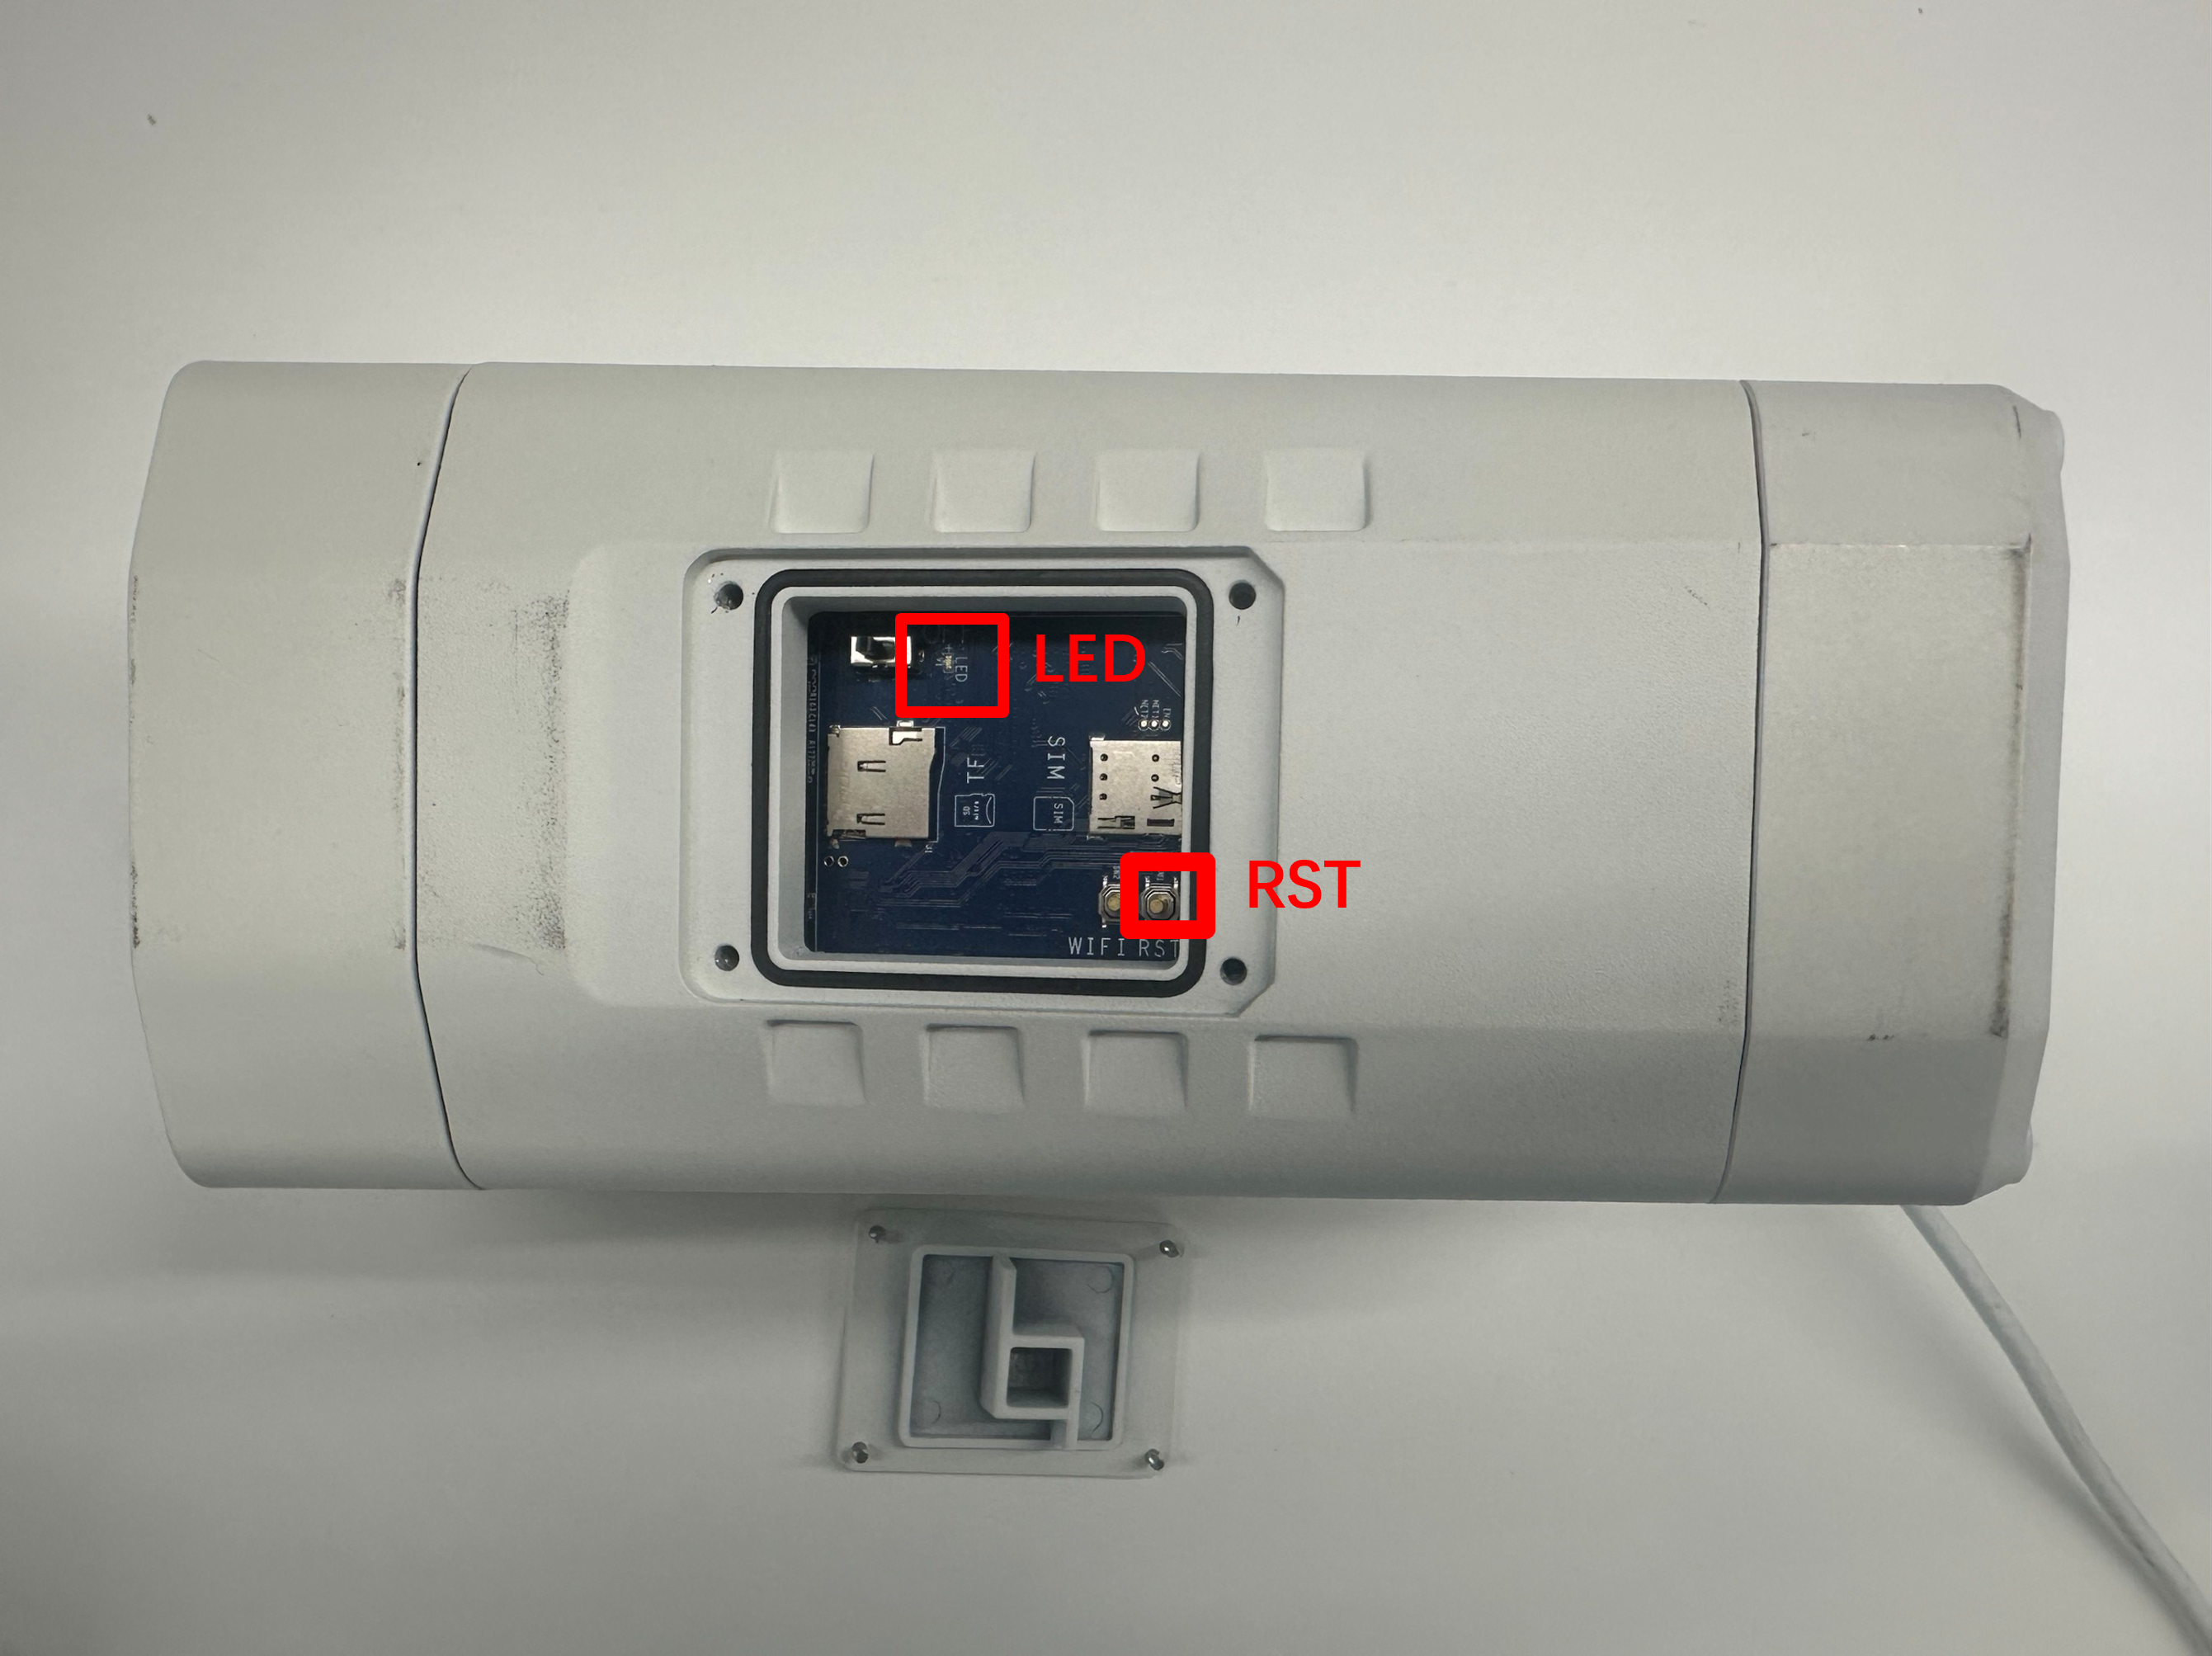
Open the back cover on the buttom of the camera ,the reset button like the figure shown below.


Wi-Fi Mini Cube (Discontinued):
A black button on the back of the camera.

